
Objects
Preflight
Write a function called mergeArrays that combines two arrays into one.
mergeArrays(['Rattata', 'Raticate'], ['Bulbasaur', 'Ivysaur', 'Venusaur'])// returns ["Rattata", "Raticate", "Bulbasaur", "Ivysaur", "Venusaur"]
Answer
Tests
Remember how this works? Create a solution file (like
preflight.js) and a test file (likepreflight.test.js). Make sure your solution filemodule.exportsan object with all the functions, and your test filerequires the solution file and gives the object a name (we usefnin our tests).describe('mergeArrays function', () => {it('should merge 2 arrays of strings', () => {const arr1 = ['Rattata', 'Raticate']const arr2 = ['Bulbasaur', 'Ivysaur', 'Venusaur']const result = fn.mergeArrays(arr1, arr2)expect(result).toEqual(['Rattata','Raticate','Bulbasaur','Ivysaur','Venusaur'])})it('should merge two arrays of numbers', () => {const result = fn.mergeArrays([9, 3, 5], [10])expect(result).toEqual([9, 3, 5, 10])})it('should merge an empty array', () => {const result = fn.mergeArrays(['Pikachu', 'Raichu'], [])expect(result).toEqual(['Pikachu', 'Raichu'])})})Shape
const mergeArrays = (arr1, arr1) => {}Explanation
- You are given array
arr1and arrayarr2. - Use
[...a...b]to combine arraysaandb. - return new array with
arr1andarr2in it.
- You are given array
Code
const mergeArrays = (arr1, arr2) => {return [...arr1, ...arr2]}
Write a function called firstLongerThan that finds the first string in an array longer than the given number.
firstLongerThan(['Ekans', 'Arbok', 'Pikachu', 'Raichu'], 5) // returns "Pikachu"
Answer
Tests
describe('firstLongerThan function', () => {it('should find a string in the middle of an array', () => {const arr = ['Ekans', 'Arbok', 'Pikachu', 'Raichu']const result = fn.firstLongerThan(arr, 5)expect(result).toEqual('Pikachu')})it('should find a string at the end of an array', () => {const arr = ['Caterpie', 'Metapod', 'Butterfree']const result = fn.firstLongerThan(arr, 9)expect(result).toEqual('Butterfree')})it('should find the first string longer than 0', () => {const result = fn.firstLongerThan(['a', 'b', 'c'], 0)expect(result).toEqual('a')})it('should return undefined', () => {const result = fn.firstLongerThan([], 5)expect(result).toEqual(undefined)})})Shape
const firstLongerThan = (arr, num) => {}Explanation
- You are given an array
arrand a numbernum. - Use array helper function
arr.find()to find the string length bigger thannumand return it.
- You are given an array
Code
const firstLongerThan = (arr, num) => {return arr.find(e => {return e.length > num})}
Write a function called getReturnValues that takes in an array of functions, and returns an array of values returned by the functions.
getReturnValues([() => {return 25},() => {return 29},() => {return 'Pikachu'}]) // returns [25, 29, "Pikachu"]
Answer
Tests
describe('getReturnValues function', () => {const fn1 = () => {return 25}const fn2 = () => {return true}const fn3 = () => {return 'Pikachu'}const fn4 = () => {"I'm function four"}it('should get 3 return values of various types', () => {const result = fn.getReturnValues([fn1, fn2, fn3])expect(result).toEqual([25, true, 'Pikachu'])})it('should return an empty array if no functions', () => {const result = fn.getReturnValues([])expect(result).toEqual([])})it('should return undefined for functions with no return value', () => {const result = fn.getReturnValues([fn4])expect(result).toEqual([undefined])})})Shape
const getReturnValues = arr => {}Explanation
- You are given an array
arr. - Use
arr.map()function to go through arrays of functions.- return by calling each function and storing their output in the new array.
- You are given an array
Code
const getReturnValues = arr => {return arr.map(e => {return e()})}
Write a function called zeroSquare that takes in a number, and returns a square two-dimensional array with the input number rows and columns filled with zeros.
zeroSquare(1) // returns [[0]]zeroSquare(2) // returns [[0,0], [0,0]]/*[[0,0],[0,0]]*/zeroSquare(3) // returns [[0,0,0], [0,0,0], [0,0,0]]/*[[0,0,0],[0,0,0],[0,0,0]]*/
Hint
This one won't be able to use the array helper functions we've learned so far—think recursion! Because we're dealing with a multi-dimensional array, your recursive function will need to pass around more than just one iterator or counter variable, and possibly more than one results array.
Answer
Tests
describe('zeroSquare function', () => {it('should create a 1x1 array of zeroes', () => {const square1 = [[0]]expect(fn.zeroSquare(1)).toEqual(square1)})it('should create a 1x1 array of zeroes', () => {const square2 = [[0, 0],[0, 0]]expect(fn.zeroSquare(2)).toEqual(square2)})it('should create a 1x1 array of zeroes', () => {const square3 = [[0, 0, 0],[0, 0, 0],[0, 0, 0]]expect(fn.zeroSquare(3)).toEqual(square3)})it('should return an empty array for 0 value', () => {expect(fn.zeroSquare(0)).toEqual([])})})Shape
const makeRow = num => {}const zeroSquare = num => {}Explanation
- You are given a number
num. - We need a helper function
makeRowto help us make rows in the 2D array. - Inside the helper function
makeRow,- We need an additional variable to keep track of how many rows to build
(let's say
i) which start at 0. - We also need an additional variable to build the row array, (let's ray
res) which will start with an empty array. - When counter
iequals numbernum,- return array
res. - return
makeRow()
- return array
- Inside the main function
zeroSquare,- We need an additional variable to keep track of how many columns to
build (let's say
i) which starts at 0. - We also need an additional variable to store the columns and rows,
(let's ray
res) which will start with an empty array. - When counter
iequals num,- return array
result.
- return array
- Call
makeRowfunction and pass number num as the argument. - Push the result of above step into
res. - Continue
- We need an additional variable to keep track of how many columns to
build (let's say
- We need an additional variable to keep track of how many rows to build
(let's say
- You are given a number
const makeRow = (num, i = 0, res = []) => {if (i === num) return resres.push(0)return makeRow(num, i + 1, res)}const zeroSquare = (num, i = 0, res = []) => {if (i === num) return resres.push(makeRow(num))return zeroSquare(num, i + 1, res)}
Overview
In the last lesson, you familiarized yourself with HTML, then learned all about arrays. You'll want to have all the array functions at your disposal for this lesson, so go back and make sure you've memorized them before going forward!
If you have any issues solving any of the Preflight questions, please review the questions and solutions. This lesson will rely heavily on the foundations covered in the previous lesson in three parts:
- The first part will build on your existing HTML knowledge and introduce you to a couple more element properties.
- The second part will teach you what you need to know about objects, a powerful non-primitive data type in JavaScript.
- The third part will introduce you to libraries and APIs.
Objects are the last, but most important, data type we'll learn in JavaScript. If the concept is new to you, remember to review frequently. After this lesson, you will have learned everything you need to solve the algorithm section of a coding interview and can start practicing the problems on leetCode. Make sure to follow the 5 steps for each problem!
HTML
In JS2 you learned about:
- The
divtag, which we use to group elements on HTML pages - Element properties:
innerHTMLandinnerText
In the last lesson you learned about setting an element's onclick attribute to
assign a function to run when the user clicks on the element. A downside to this
method is that you can only assign one function to each element. Best practice
is to run the element's addEventListener function:
addEventListener('eventName', function).
Let's see how our original example from JS1 would look with an event listener:
<button class="submit1">Click Me</button><script>const button1 = document.querySelector('.submit1')button1.addEventListener('click', () => {alert("Ouch!")})</script>
The first argument, 'click', is a string event that is supported in the
browser. Other events you can add events for include mouseenter ,
mouseleave, mousemove, and keyup. These events will be covered in further
details but if you want to find out other events that the browser supports, do a
search for Browser DOM Events
If you struggled with the HTML section in JS2 ( the previous lesson ), please make sure you review / redo them again before starting this section. In the exercise section, try to come up with the steps yourself before coding!
In this section, you will learn one more element and some very important functions that allow us to work with arrays in the browser.
Elements
Select
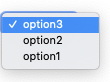
select allows you to build dropdown menus. The choices go inside option
elements, which are children of the select element:
<select><option>Mild</option><option>Medium</option><option>Spicy</option></select>
If we have an array of strings that we want to use for the options, we can use
reduce to generate string tags and then set the innerHTML property of the
select:
<select class="selectContainer"></select><script>const data = ['Charmander', 'Squirtle', 'Caterpie']const select = document.querySelector('.selectContainer')select.innerHTML = data.reduce((acc, e) => {return (acc +`<option>${e}</option>`)}, '')</script>
Browser Functions
JSON.stringify
When websites send information to each other, the data is always sent and received as strings. So what do you do if you need to send an array across the Internet? You convert it to a string first!
When data (number, boolean, string, array, objects) is converted into a string, the string is called JSON. JSON stands for JavaScript Object Notation.
Databases also store data as strings, so if you want to store an array of names into the database sometimes you must convert your data to a string first.
You can turn any JavaScript data into a string with JSON.stringify.
Although JSON is primarily used for working with browsers, you can also follow along with all the below examples in node.
Exceptions: cyclic data, which can happen in non-primitive data types, and functions
// Example of something that will throw error for JSON.stringifyconst a = []a.push(a) // a[0] points to itselfconst b = JSON.stringify(a)// Computer will get stuck trying to stringify a and throw error.const c = [() => {}]JSON.stringify(c)// Functions cannot be stringified.// Since c has a function inside, it cannot be stringified.
const arr = [-18, 'Charizard', true]const strArr = JSON.stringify(arr)// strArr is '[-18, "Charizard", true]'
JSON.parse
If you used the previous function JSON.stringify to convert an array into a
string, how do you convert the string back into an array? You use the
JSON.parse function. This function takes a string and parses, or
interprets it as JavaScript data.
const arr = [-18, 'Peter Parker', true]const strArr = JSON.stringify(arr)const newArr = JSON.parse(strArr)// newArr is an array: [-18, "Peter Parker", true]const isSame = arr === newArr// is isSame true or false?
Answer
/*false because they have different addresses.Because strings are primitive,when you convert an array into a string,the address to the array is gone.When you convert a string into an array,the computer creates a new array (at a new address).*/
JSON
Let's review how all of this works.
JSON is the string that gets returned by JSON.stringify and the argument you
pass into JSON.parse.
JSON.stringify( data ) ——> JSON ——> JSON.parse(JSON) ——> data
LocalStorage
LocalStorage lets you store data, like a database in the browser. There are many ways you can make use of LocalStorage when writing a JavaScript program, and you'll get to try a couple of examples in the next Exercise section. Here are the two key functions you'll need to know:
localStorage.setItem
localStorage.setItem is a function that takes in 2 strings.
- The first string tells the browser which title to give the data
- The second string is the data to store
localStorage.getItem
localStorage.getItem takes in only a string, the title of the data to
retrieve, and returns the data.
LocalStorage Example
Here's a quick UI that lets the user add text to LocalStorage. Save this as an HTML page, try storing some data, then reloading the page and storing more—you'll notice that unlike what we've used to store data so far, the LocalStorage data is persistent across page reloads. (This script logs to the console, so read this to learn how to open your browser's console.)
<input type="text" class="textBox" /><button class="submit">Store it</button><script>const submitButton = document.querySelector(".submit")const textBox = document.querySelector(".textBox")// First grab what's already in local storage.// We use || '[]' to start an array the first time// because getItem will return nullconst lsData = localStorage.getItem('mydata') || '[]'// Turn string into an arrayconst dataArray = JSON.parse(lsData)submitButton.onclick = () => {// Push the new text into itdataArray.push(textBox.value)// Store it back, turning it into a string on the waylocalStorage.setItem('mydata', JSON.stringify(dataArray))// Then console.log everything stored up till nowconsole.log(dataArray)}</script>
To clear your browser's localStorage, open your browser's devolper tools and follow these instructions:
Chrome users
Instead of the Storage tab, you should click on the Applications tab:


document.querySelectorAll
Recall how document.querySelector selects the first element it finds that
matches its argument. document.querySelectorAll is similar, except it returns
an array of all the elements that match the query.
<div><button class="hello">Hello</button><button class="hello">Hola</button><button class="hello">Bună ziua</button><button class="hello">Aloha</button><h1 class="hello">Hi World!</h1></div><script>const hellos = document.querySelectorAll('.hello')// hellos is an array of length 5:// [buttonElement, buttonElement, buttonElement, buttonElement, h1Element]const buttons = document.querySelectorAll('button')// buttons is an array of length 4:// [buttonElement, buttonElement, buttonElement, buttonElement]// To bind an onclick to each button element, simply use forEachbuttons.forEach((button, i) => {button.onclick = () => {alert(`This is the button at index ${i}`)}})</script>
Exercises
Some of these UI exercises may seem intimidating. When you feel overwhelmed, take a deep breath, think about what you know, and make sure to start with that. When you work as a software engineer, you will have to handle projects that seem really intimidating. In these situations, it is important to think about what you know and understand, then slowly branch out from there piece by piece.

Good engineers spend the majority of their time thinking, not coding. Whether you are working on these exercises, interviewing for a software engineering job, or working on projects, make sure you spend the first half of your allotted time thinking through the problem before actually starting to code.


To see each page in action, click on the link. To view the solution, right-click
anywhere on the page and select View Source.
Debugging - If your page is not doing what you want it to do, you can look
at the console. This is where the browser will try to tell you what the error
is if you've written your code in a way it can't understand.
Read this to learn how to open
the browser's console.
- Create a dynamic select option generator: Type a string into the input box and click the Add button. The string should show up as an option.
Overview
- Create a
h1,input,buttonandselectHTML tags and select the elements by their class name. If you don't know what some of the tags do, read about them at w3schools and make sure you try them out. - set the button's
onclickto be a function that does the following:- Grab the value from the
inputtag. - Create a string for
optiontag and add to existing select element's innerHTML - Set the select element's innerHTML to the new combined value
- Grab the value from the
- Create a todo list: Click the Add
button to add a todo item. It should show up as an
h2element. If you click on a todo item, it should be removed.
Hint
Because you'll be keeping the todo items in an array, and changing that array whenever the user marks an item as complete, you'll have to reload the todo list each time a todo item is clicked. Removing an item changes the other items' positions in the array, so you'll also have to remake all the other items' onclick functions. Write a function that does both of these things and make sure it's called when adding or removing an item.
Debrief
Examples: Try adding and removing several items from various positions on the example page (first item, last item, middle item). The other items should reorder themselves.
Function shape: As mentioned in the hint, we'll need a function to load all the todo items onto the page. This will run whenever an item is added or removed, and has no parameters or return value. The only other function is a quick one to add a new element based on user input. Here are those two, along with a simple HTML template to record and display todo items:
<h1 class="display">TODO LIST</h1><input class="newText" type="text" /><button class="add">Add</button><div class="todoList"></div><script>const list = document.querySelector('.todoList')const inputElement = document.querySelector('.newText')const buttonElement = document.querySelector('.add')const render = () => {}buttonElement.onclick = () => {}</script>
Think: We'll store the todo items in an array and then turn them into h2
elements each time the list is loaded. Each h2 should have an onclick that makes
it go away. How do we do that? We haven't learned a way to remove the element
directly, but if we remove the item from the array and then refresh the list,
that will have the same effect. We could look through the array for the string
we're removing, but what if the user had the same item in their todo list twice?
We might remove the wrong one. So we'll include each item's current position in
its onclick function. This will change every time an item is removed, but that's
OK because the onclick functions will be rewritten as well.
Code: Before any of the functions use it, we should initialize the array:
const todos = []
For the render function, there are 2 steps: turn everything into HTML and give
them their new onclick attributes. The onclick functions will need to call
render again refresh the list.
const render = () => {list.innerHTML = todos.reduce((acc, e) => {return acc + `<h2 class="todo">${e}</h2>`}, '')const todoElements = document.querySelectorAll('.todo')todoElements.forEach((e, i) => {e.onclick = () => {todos.splice(i, 1)render()}})}
All that's left is buttonElement's onclick function, which will be called when
the user inputs a new todo item. We use unshift to add to the array so that it
will start at the top of the list.
buttonElement.onclick = () => {const newValue = inputElement.valuetodos.unshift(newValue)render()}
Test: Add some items and, again, make sure that whether you remove them from the beginning, middle, or end, the other items move correctly.
Right now, our todo list is only good as long as you keep the page open. In the next part, you'll make it a lot more practical.
Overview
There are many ways to solve this. Our answer is one way that we feel is more organized. Please take the time to understand the steps.
Create a
h1,input,buttonanddivHTML tags and select the elements by their class name.We need an array to hold all of the
todoitems, let's call ittodoListconst todoList = []Write a function called
renderthat sets thediv'sinnerHTMLproperty to a string ofh1elements fromtodoListarrayconst todoList = ['hello', 'student', 'coder']const result = render()/*div 's innerHTML will be set to:'<h1 class="todo">hello</h1><h1 class="todo">student</h1><h1 class="todo">coder</h1>'*/Run the button's
addEventListenerproperty and pass in two arguments:'click'and a function that:- Adds the input value into
todoList - Run
renderfunction
- Adds the input value into
Delete: Update the render function so that after the div's
innerHTMLproperty is updated:- Get array of
.todoelements - For each element, add
clickevent listener to each element. When element is clicked:- Remove the element (at that index)
- Run
renderfunction
- Get array of
- Part 2: Save the todo items on the
client-side using
localStorage.
Debrief
That wasn't too bad, was it? It only takes a few lines of code to implement
localStorage. When the page first loads we load existing todo items from
localStorage (using localStorage.getItem('todo') || '[]' in case there's
nothing there). But we need to update localStorage every time an item is added
or removed, because the user could close the page at any time.
Overview
- Repeat the steps in part 1 of this exercise.
- In the
renderfunction, addlocalStorage.setItemto update you list in local storage. - When the page loads, set
todoListtoJSON.parse(localStorage.getItem("storedTasks") || '[]')- Notice how we add
|| '[]'so that if thelocalStorageis empty(user's first time on the page), we parse an empty array string instead. SotodoListis set to an empty array.
- Notice how we add
- Run the
renderfunction after you settodoListwhen the page loads.
Part 3: Add a filter functionality: Type a few characters and click on Filter to only see todo items matching what you typed.
strings have a
.includes()function that takes in a string argument and tells you if the string exists inside the larger string.const tropical = 'pineapple'tropical.includes('apple') // returns true because "apple" is part of "pineapple"tropical.includes('yellow') // returns false because "yellow" is not part of "pineapple"
Debrief
Overview
- Please follow all the steps in the previous part(part 2) of this exercise.
- Create an additional
buttonandinputtags and select elements by their class name. - Change
renderfunction:- Get the value of the filter input.
- Use filter to get a new array of strings from
todoListthat has the strings in filter input - Generate string from the new Array
- Attach a click event listener to the filter button. The function should run the filter function
- Create a storybook, a site where you can read a book.
Overview
- Create a previous
buttontag, nextbuttontag, a withhrtag, add adivto store individual stories in the UI,hrtag,textareatag to allow users to write their individual story, anotherbuttonto submit stories and finally adivto display all the stories. - Create a variable to track a given
index. It starts at 0. - Display the first individual story in the first
divwe created. - Create a
renderfunction which allows you to,- Empty the
divwith all stories. - Displays the list items into the UI.
- Items can be deleted when they're clicked upon.
- Updates the list every time an item is deleted.
- Empty the
- Call the
render()function. - Attach click event listener to submit
button,- Updates the list with new user input
- Call the
render()and update the UI with newly added stories.
- Attach click event listener to previous
button,- When
indexis 0, returnalertthe user that they have reached at the beginning of the book. - Decrement
indexby 1. - Update story
divinnertext to display the current index of the list.
- When
- Attach click event listener to next
button,- When
indexhas reached to the second to the last element of the list, it returnsalertnotifying the user that they have reached the end of the book. - Increment
indexby 1. - Update story
divinnertext to display the current index of the list.
- When
- Create a Friend Age Notebook, a site to store your friends' ages. Careful, make sure to store name and age separately to make the next part easier.
Answer
Create an
h1tag, twoinputtags for name and age, onedivtag to display name and age , and an addbutton. Select the elements by class name.Create two different arrays to store input values for name and age. Let's call the arrays
storeNameandstoreAge.Create a
renderfunction. Inside this function,Attach
reducemethod to the arraystoreName.- Create a variable
ageinside thereducemethod and set it current index of arraystoreAge.
- Create a variable
Set the
innerHTMLofdivto :<div><h2 class="displayName">${e}</h2><h3 class="displayAge">${age}</h3></div>If you are having hard time figuring out where
eis coming from in the code, then please review the array methodreduceand how it works.
Attach
addEventListenerto addbutton. It takes in two arguments.- Pass in
"click"as the first argument. - Pass in a function as the second argument.
- This function grabs the input values and stores them inside the
storeNameandstoreAgearrays. - Runs the
renderfunction.
- This function grabs the input values and stores them inside the
- Pass in
- Part 2: Add localStorage to store the data, then hide the age (don't display it). When you click on a name, alert the friend's age.
Overview
- Follow and complete all the steps from the previous part before you begin this particular exercise.
- When the page loads,
JSON.parseboth arrays that you have stored in thelocalStorage.- Run the
renderfunction.
- Update your
renderfunction to do:- Hide elements from the array
storeAgein the UI. - Select the
h2element by its class name. (Thish2element was created in the first part of this exercise.) - Attach
onclickmethod to eachh2element. Thisonclickwill run thealertfunction which will display the age.
- Hide elements from the array
- Add
localStorage.setItemto store the updated arrays inside the event listener for the addbutton.